Understand Quarkus extension
The aim of this article is to present Quarkus extension concepts.

As a developer, you spend a lot of time using libraries from external or internal sources. In the end, a large part of the effective code running in your application is not from the application itself.
Now, imagine a way to integrate these dependencies seamlessly, limit the memory footprint, enforce rules about how to use them and make the developer job easier.
Here the purpose of Quarkus extension.
Overview

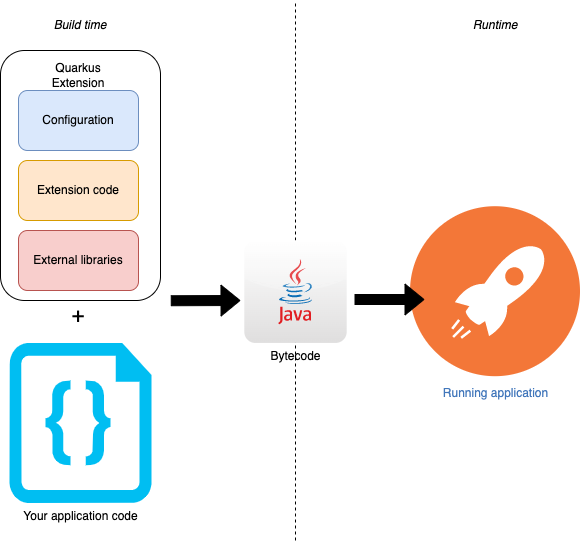
Extension processing collects information about your application code and configuration you provide at build time. Then it produces valuable features like:
- built-in beans (in CDI context)
- database or broker client
- data mapper (Jackson, JAX-B, ...)
- rest client
- generated POJO (e.g from schema files)
- OpenAPI or WSDL file generation
- dev services (based on Testcontainers)
All of them are produced during the augmentation phase (build time) and won't impact the application startup duration. Also it limits the memory size as the extension classes use to produce those features disappears at runtime.
Extension project structure
Extension project has a specific structure with two main parts:
├── deployment
│ ├── src
│ │ ├── main
│ │ │ ├── java
│ │ │ │ ├── MyProcessor.java **1**
│ │ │ │ ├── MyBuildTimeConfig.java **2**
│ ├── pom.xml **3**
├── runtime
│ ├── src
│ │ ├── main
│ │ │ ├── java
│ │ │ │ ├── MyBean.java
│ │ │ │ ├── MyRuntimeConfig.java **4**
│ │ │ │ ├── MyRecorder.java **5**
│ ├── pom.xml **6** // Dependencies available at runtime
├── pom.xml
Each one has its own module and will produce a dedicated jar:
- <my-extension>-deployment.jar for deployment
- <my-extension>.jar for runtime
Deployment module
Deployment part represents what will be used at build time phase and won't be available at runtime.
Processor
It is the most important class of the deployment module as it orchestrates the build steps. Build steps are methods annotated with with @BuildStep which receives ("consume") one or more build items and produces other build items
@BuildStep
void createMyBean(BeanArchiveIndexBuildItem index, BuildProducer<AdditionalBeanBuildItem> additionalBeanBuildItemProducer) {
   /* Browse classes information through index and register new bean with BuildProducer<AdditionalBeanBuildItem> producer;
  */
}
Here our method receives BeanArchiveIndexBuildItem which contains application classes information and the producer BuildProducer<AdditionalBeanBuildItem> which is used to add a bean in the runtime CDI context.
Quarkus comes with many build items but you can create your own ones by extending SimpleBuildItem or MultiBuildItem .
The index build item (based on Jandex library) is extremely powerful as it allows to know in details how your application is designed and adapt the build time behavior according to content.
A specific build step annotated with @Record, allows to deffer code execution at runtime, it is called a recorder (see Recorder section)
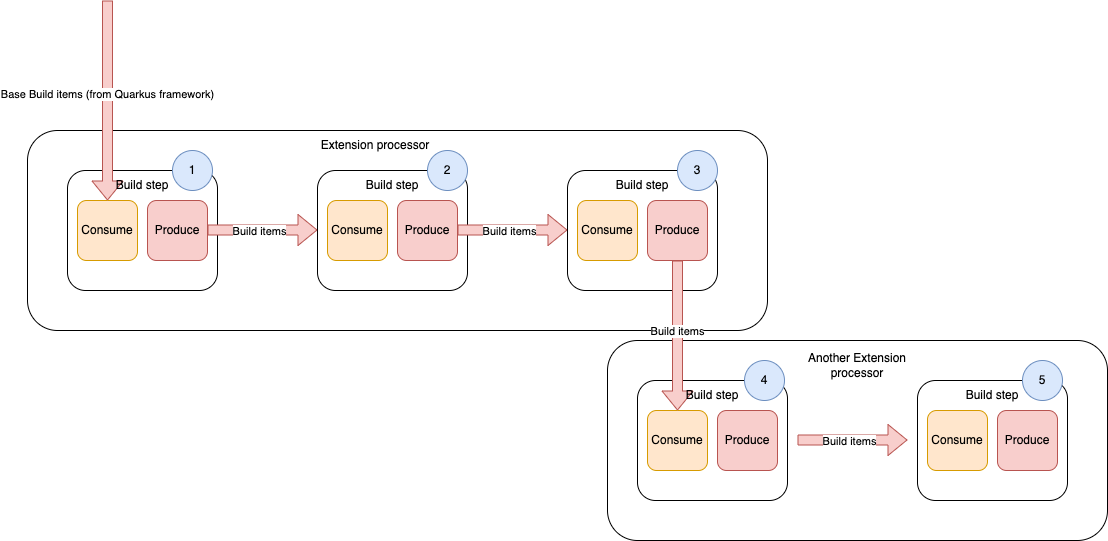
As mentioned before, processor can be composed of several build steps which communicate each other through build items.

Build step method can receive information from Quarkus core build items (Class index, configuration, ...), current extension build items and also from others extensions !
The execution order depends of what it consumes and produces. For instance, the build step 2 will be triggered after the build step 1 because it consumes item produced by step 1.
Notice that this behavior is also valid for external extension build steps. Thus, the build step 4 will be executed only after step 3 has produced its item.
As you can see in the build step 4, extensions are able to communicate between each other. It is a convenient way to override or apply rules on public extensions. (e.g. enforce your own configuration).
Build time config
This class is annotated with @ConfigRoot (with ConfigPhase.BUILD_TIME ) and contains configuration you have provided in application.properties (or application.yaml) before starting the build command.
@ConfigRoot(name = "my-configuration", phase = ConfigPhase.BUILD_TIME)
public class BuildConfig {

    @ConfigItem(defaultValue = "true")
    public boolean enabled;

}
Here the enabled configuration determines if the extension must be activated or not. The BuildConfig is consumed by build step method.
Deployment pom.xml
Besides containing external dependencies (quarkus and others), pom.xml of deployment module contains runtime module as dependency.
<dependencies>
 <dependency>
     <groupId>io.quarkus</groupId>
     <artifactId>quarkus-arc-deployment</artifactId>
 </dependency>
 <dependency>
     <groupId>com.acme</groupId>
     <artifactId>my-runtime-module</artifactId>
     <version>${project.version}</version>
 </dependency>
 ...
It's very important as build steps processing often needs classes from runtime module like beans, runtime configuration or recorders (see Recorder part). Contrary to deployment module classes, these ones must be present in application classpath at runtime. That's why deployment module depends on runtime one.
Keep in mind that all dependencies present in this file won't be available at runtime (except your extension runtime module).
Runtime module
Runtime config
It is equivalent to your build time config but for runtime phase.
@ConfigRoot(name = "my-runtime-configuration", phase = ConfigPhase.RUN_TIME)
public class RuntimeConfig {

    @ConfigItem(defaultValue = "true")
    public String url;

}
You will find configuration that don't affect the build time behavior like url, credentials, log configuration and so on.
Recorder
Recorders collect execution statements and write it as bytecode. Thus, when the application starts, this code is executed with information collected at build time.
The main goal of recorders is to be able to execute "build time code" with runtime context (bean context, servlet, ...).
Statements recording needs two elements, a dedicated class with @Recorder annotation and a build step with @Record annotation.
@BuildStep // Method in extension processor
@Record(ExecutionTime.RUNTIME_INIT)
 void displayHttpPaths(MyRecorder recorder, BeanArchiveIndexBuildItem indexBuildItem) {
     MyDataObject dataObject = new MyDataObject();
     ... // fill dataObject with build time information
     recorder.recordStatement(dataObject); // Trigger bytecode recording
}
This special buildstep receives a recorder (from runtime module) along with build items (see Processor part). Here we create MyDataObject from index information and invoke recorder method with this object.
@Recorder
public class MyRecorder { // Class from Runtime module
 public void recordStatement(MyDataObject dataObject) {
     var myBean = Arc.container().instance(MyBean.class).get(); // All these statements will be executed
     myBean.initialize(dataObject); // at runtime
}
recordStatement receives dataObject and is executed at runtime. In this case, it allows to initialize a bean with build time information.
Be aware that contrary to Buildstep methods, recorder has access to the whole application context (CDI, servlet engine, ...).
Recorders can be used in two modes, STATIC_INIT and RUNTIME_INIT.
The first one is executed from static method of the application main class. But it can't instance new thread or making IO statements.
In native mode (GraalVM), this code run at binary build and results are written directly in the artifact.
The second mode is executed as regular code after static phase.
Important
Quarkus philosophy is to do as much as possible at build time to limit resources consumption at runtime. So recorder statements should be limited to minimum (specially in RUNTIME_INIT mode). Generally recorder statements are used to manipulate beans from CDI context (not available at build time).
Runtime pom.xml
Contrary to pom.xml file in deployment module, dependencies from this one will be in the application classpath at runtime.
Conclusion
Extension is a powerful tool, as it allows to add new capabilities while limiting resource consumption by doing most of the process at build time. It's also a good way if you want to enforce company rules or best practices on existing extensions.
Finally, you can improve development experience by providing built-in beans or start containers to boostrap dev environment (aka dev services).
The next article will explain how to create a simple extension with code examples.
