Quarkus and OAuth2 (part 1)
Security between microservices, an example with Quarkus and OAuth2

Introduction
In microservices architecture, a lot of interfaces are exposed as each service is isolated from others , but how secure communication between all these services ?
Overview

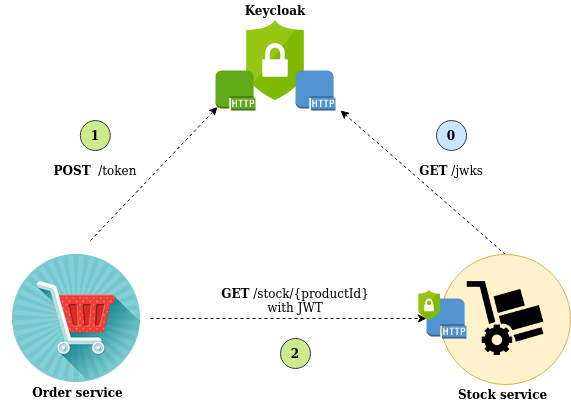
We have a Stock service which give you the current stock associated to a product reference. Basically, it exposes a simple endpoint responding on HTTP Get method.
This endpoint is secured against a JWT validation, and only client with a valid token is allowed to get data.
On the other side, we have an Order service which needs to get products stocks to ensure that the order won't be rejected. The service ask a token to an Authorization server (here Keycloak) using OAuth2 Client credentials flow.
Once it gets the token, it send a request to the stock service (with the token). The stock service will validate the token by checking the signature (using Keycloak public key) and expiration time. It will also validate others fields but we gonna see that later.
And… that's it !
In the first part, I'm going to show you how to secure a service thanks to Microprofile JWT RBAC specification. And also, how Quarkus makes easier the development of secured microservices.
Start the service
The code base is available here: jami-quarkus-stock-service
To start the application in development mode (with hot reload), launch the following command:./mvnw package quarkus:dev
The application should respond on http://localhost:8080/stocks.
As Quarkus is based on extensions, the project contains the followings in the pom.xml:
| Quarkus extension | Description |
|---|---|
| RESTEasy | JAX-RS implementation |
| RESTEasy Jackson | Json serialization support for RESTEasy |
| OIDC | JWT validation and Keycloak Dev service |
| Container image Docker | Build Docker image |
| Test Security | Support for testing on a secured endpoint |
Rest layer
OIDC extension is responsible of the Rest layer securing using JWT validation.
package org.jami.stock.resource;

import javax.annotation.security.RolesAllowed;
import javax.enterprise.context.RequestScoped;
import javax.ws.rs.GET;
import javax.ws.rs.Path;
import javax.ws.rs.PathParam;
import javax.ws.rs.Produces;
import javax.ws.rs.core.MediaType;

import org.jami.stock.model.ProductStock;

@Path("/stocks")
@RequestScoped
@RolesAllowed({ "order-flow" })
public class StockResource {

	@GET
	@Path("/{productSku}")
	@Produces(MediaType.APPLICATION_JSON)
	public ProductStock getStockBySku(@PathParam(value = "productSku") String productSku) {
		return new ProductStock(productSku, 10);
	}

}
@RolesAllowed, only client which have the role order-flow will be permitted (see OAuth2 configuration below)
I have intentionally kept it simple as possible, there is no business logic and it responds always the same value. In a real service, they would have business and repository layers.
About role value
This value is used for the Authorization part and should be present in token claims to allow access to the endpoint. By default this value must be in the groups token claim (as mentioned in the Microprofile specification https://www.eclipse.org/community/eclipse_newsletter/2017/september/article2.php), but it can be changed in application.properties using quarkus.oidc.roles.role-claim-path property.
And we are done for the Java part, now let's see how we configure the token validation.the next one is done in configuration file.
Configuration
Local (dev profile)
As you may have noticed when you start the service, Quarkus create a Keycloak container automatically. It's a development feature called Dev Service and it is triggered by the presence of the quarkus-oidc extension in pom.xml.
It is very useful as it avoids to install an authorization server by our self to test the service security.
Embedded Keycloak configuration
The local Keycloak comes with a default configuration with users and roles, but it doesn't really fit our needs as it is more for physical users authentication (Authorization Code flow).
So I put a custom configuration in the project (realm-export.json), and configure application.properties to target this file. Thus, Keycloak container will use this configuration instead of the default one.
quarkus.keycloak.devservices.realm-path=realm-export.json
Here the service account we will use to get an access token:
| client id | client secret | role |
|---|---|---|
| order-service | secret | order-flow |
Get a token
The quick way
Thanks to Keycloak Dev service, you can get a token quickly with Quarkus Dev UI. You just have to specify which client it has to use:
quarkus.oidc.client-id=order-service
quarkus.oidc.credentials.secret=secret
quarkus.oidc.application-type=service
quarkus.keycloak.devservices.grant.type=client
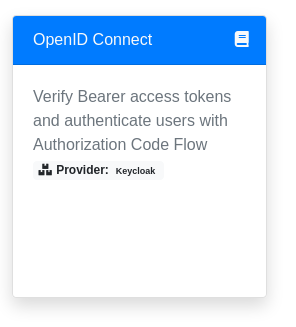
You can access to Keycloak from the Quarkus Dev UI on http://localhost:8080/q/dev/, on OpenId Connect section:

Click on Provider button and fill the input field with the following path:

Click on Test service and you should receive a HTTP 200 code. Also, the token should be displayed in the terminal below:

Under the hood, Dev UI send a request to Keycloak container to get a token using the above configuration. Then it send a GET request to stock service on /stocks/1234 path with the token in Authorization header.
If you decode the token (using https://jwt.io for example), you will see order-flow in groups claim.
Unfortunately, you're limited to HTTP GET method,
The conventional way
Using a Rest Client like Postman or Curl to get token:
curl --location --request POST 'http://localhost:8083/auth/realms/quarkus/protocol/openid-connect/token' \

--header 'Content-Type: application/x-www-form-urlencoded' \

--data-urlencode 'client_id=order-service' \

--data-urlencode 'client_secret=secret' \

--data-urlencode 'grant\_type=client\_credentials'
Once you get the token, you can call the stock service endpoint putting the token in Authorization header:
curl --location --request GET 'http://localhost:8080/stocks/1234' \
--header 'Authorization: Bearer <INSERT TOKEN HERE>' \
--header 'Content-Type: application/json'
Why my token is rejected ?
If the token is rejected (401 Unauthorized), you can enable OidcProvider log to debug to see why:
quarkus.log.category."io.quarkus.oidc.runtime.OidcProvider".level=TRACE
quarkus.log.category."io.quarkus.oidc.runtime.OidcProvider".min-level=TRACE
Example:
[io.qua.oid.run.OidcProvider\] (vert.x-eventloop-thread-1) Verification of the token issued to client order-service has failed: The JWT is no longer valid - the evaluation time NumericDate{1634241702 -> Oct 14, 2021, 8:01:42 PM GMT} is on or after the Expiration Time (exp=NumericDate{1634195604 -> Oct 14, 2021, 7:13:24 AM GMT}) claim value.
Real environment (staging)
For a real environment, you have to add properties about your authorization server url:
%staging.quarkus.oidc.auth-server-url=http://keycloak:8080/auth/realms/master
The quarkus.oidc.auth-server-url property tells to Quarkus which url it has to use to get information about token validation (following the OAuth2 specification https://tools.ietf.org/id/draft-ietf-oauth-discovery-08.html#rfc.section.3). By default, it will append .well-known/openid-configuration to get the Discovery url.
This url is public and list all others url exposed by your authorization server. Among theses urls, the most important for us is the jwks url which gives the public key to validate token signature.
Here I'm using Keycloak deployed as a container on Kubernetes, so this configuration depends of what is your authorization server and where it is deployed.
About the %staging prefix
Quarkus uses MicroProfile Config specification with profiles, it means that when we will start the service, Quarkus will select properties associated to the current profile (and also the ones which don't have prefix).
Here I want to configure the token validation on my staging environment so I add %staging prefix on quarkus.oidc.auth-server-urlquarkus.oidc.auth-server-url property.
Testing
quarkus-junit5 extension brings @QuarkusTest and @TestHTTPEndpoint annotations which start the application context before launching the tests and configure RestAssured library to call and assert endpoint response.
quarkus-test-security extension brings @TestSecurity annotation and allows to mock security context.
package org.jami.stock.resource;

import static io.restassured.RestAssured.given;
import static org.hamcrest.CoreMatchers.equalTo;

import org.junit.jupiter.api.Test;

import io.quarkus.test.common.http.TestHTTPEndpoint;
import io.quarkus.test.junit.QuarkusTest;
import io.quarkus.test.security.TestSecurity;

@QuarkusTest
@TestSecurity(user = "order-service", roles = { "order-flow" })
@TestHTTPEndpoint(StockResource.class)
public class StockResourceTest {

	@Test
	public void getStockBySku() {
	given().when().get("/1234").then().statusCode(200).body("quantity", equalTo(10)).body("sku", equalTo("1234"));
	}
}
Build
Depending of how you deploy your service, this command may vary. Here, I want to deploy my service as a container, so I add the parameter -Dquarkus.container-image.build=true to build a image and -Dquarkus.container-image.image to tag this image with my registry url.
./mvnw clean package -Dquarkus.container-image.build=true -Dquarkus.container-image.image=docker-registry:31320/jami/quarkus/stock-service -Dquarkus.profile=staging
Also notice the -Dquarkus.profile which specify the target environment.
Native
The previous command will build a image in a JVM mode. But if you want to build a image using the native mode, you can add the following option:-Pnative -Dquarkus.native.container-build=true -Dquarkus.native.builder-image=quay.io/quarkus/ubi-quarkus-mandrel:21.2.0.0-Final-java11
See Quarkus documention for more details.
Run the service with Docker:
docker run -p 8080:8080 docker-registry:31320/jami/quarkus/stock-service:latestConclusion
Thanks to Quarkus framework, it is really easy to handle the security layer of a microservice. Most of the stuff is done with annotations and configuration. Moreover, the Keycloak Dev service really speeds up the development.
In the second part, we will see how the order service can request a token and call the stock service.
